
What really is WebGL?
WebGL is a Javascript api for rendering 2d and 3d on the web. It allows for image processing, effects and even physics simulations run on your computer’s gpu, rendering onto a HTML Canvas. It enables you access the capabilities of your computer’s gpu directly from the browser using Js and is based on OpenGL ES. WebGL is a JavaScript API that wraps around OpenGL and allows web developers to work with it in a more accessible way.
OpenGL & OpenGL ES
OpenGL
OpenGl is is a cross platform, cross language extensive low-level graphics library and api for defining (drawing, rendering) 2d & 3d graphics. It interacts with a GPU (graphics processing unit) to perform graphics rendering. When an OpenGL context is opened, it is essentially a connection to your computer’s GPU, shaders are compiled (using GLSL, OPenGL shading language), shaders runs on your gpu. Shaders contain the processing data about vertices and pixels (fragments), this in turn renders commands to openGL (about points, spatial data, textures, geometry, depth, light etc) which are executed on your GPU. Before the graphic is displayed on your screen, the shaders are processed (vertex & fragment), rasterisation, fragment operations and some others before it is written into a framebuffer.

TLDR; OpenGL is a low level api for rendering graphics, allowing developers to interact with the graphics hardware (gpu) and produce hardware accelerated visual output.
You can also checkout Direct3D, Vulkan if you want to learn about other 3D Api’s.
OpenGL ES
Well it’s still OpenGL but for Embedded systems, it is a subset of openGL used in embedded systems, mobile devices, and other resource-constrained platforms (smartphones, tablets, game consoles etc). WebGl is based on this specialised version, it omits some of the features and functions found in the desktop version of OpenGL.
Shaders & GLSL
I’ll keep this short, Shaders are like tiny computer programs that work inside your computer’s graphics card. They tell the graphics card how things should look on your screen, including colors, brightness and adding textures to objects. GLSL is a specialised programming language designed for writing shaders that run on the GPU. It’s specific to the OpenGL ecosystem and its variants, including WebGL. GLSL is C-like in its syntax and structure.
You can read more here: The Book Of Shaders
TLDR: WebGL is a JS api based on OpenGL ES that renders 3d in a web browser, support for it is present in most browsers. When you use highly abstracted libraries (Babylon, Three JS) to create and render 3d on the web, shaders are generated and then compiled into a format that can be executed on the gpu.
For more knowledge you can read/watch these resources:
GPU’s, OpenGL and WebGL
What Is a GPU? Graphics Processing Units Defined
How does a Rendering Engine work? An overview — Harold Serrano - Game Engine Developer
WebGL 3D Graphics Explained in 100 Seconds
WebGL, Shaders, Vertex Shader, Fragment Shader, GLSL ES, and WebGPU In A Nutshell
Introduction to GPUs with OpenGL
WebGL - Rasterization vs 3D libraries
Some on Shaders; basic knowledge of what they are
Introduction to Shaders: Learn the Basics!
Three.Js (probably why you’re here)
What is Three.Js?
ThreeJS, (which forms the core of what i work with) is a popular Javascript library built on webGL, with it you can create and display 2d & 3d computer graphics in your browser, It provides a high-level abstraction for working with 3D graphics in the browser.
There are a lot of WebGl frameworks written in Js & Ts but ThreeJs is particularly of choice because It offers various features and utilities for 3D rendering, including cameras, lights, materials, geometries, and more. It makes it easier to work with 3d graphics in the browser, because under the hood it handles a whole lot of things by providing a framework in its object oriented interface creating scenes, objects, and interactions.
When developing web-based 3D applications, you can choose to use WebGL directly, but this often involves writing more code and dealing with lower-level details. Three.js is a popular choice because it makes 3D web development more accessible and productive, allowing developers to create rich 3D experiences in a more straightforward manner.
Three.Js Concepts
To me, the best way to learn (the way I learn) is by studying the documentation. So i highly recommend you go through it first. But here are some resources that’ll definitely help you understand three’s structure.
Three.js Tutorial For Absolute Beginners
Three.js Crash Course For Beginners | Create This Awesome 3D Website!
The Beginner’s Guide to Beginning Three.js
Just incase you would want me to explain the some concepts of three, here you go
Tutorial, Let’s Learn and Build Something Real Quick.
Renderer
The Renderer in Three.js is a critical component that takes your 3D scene and projects it onto a 2D surface, making it visible to users. It handles rendering, sizing, pixel ratios, and other settings to create visually appealing and interactive 3D graphics in your web applications.
const renderer = new THREE.WebGLRenderer({ antialias: true });

// set the size of our renderer to assume the height and width of the window
renderer.setSize(window.innerWidth, window.innerHeight);

//appending the canvas it creates to the dom
document.body.appendChild(renderer.domElement);

function animate() {
	renderer.render(scene, camera);
}

renderer.setAnimationLoop(animate);
Here i’m using the WebGLRenderer, the other option is a canvas renderer which relies on 2d techniques for drawing 3d, it doesn’t support WebGl and is not as fast and efficient as the CanvasRenderer. It has been deprecated in recent versions.
https://threejs.org/docs/?q=renderer#api/en/renderers/WebGLRenderer
Scene
The Scene is a fundamental component that represents a 3D environment or world where you place and arrange objects, cameras, lights, and other elements for rendering. It serves as a container for all the objects and entities that make up your 3D scene
// instantiating the Scene Object from Three
const scene = new THREE.Scene();

//in the event that we create objects, lights, geometry;
// we can add them to our world using:
// scene.add(3ditem)
Camera & Lights
Camera: This is a class for creating a camera in our app, a camera is essentially the perspective from which our 3d scene is viewed and rendered. It determines what is visible within the scene and how it appears in the final rendering.
There are various camera types: Perspective Camera, Orthographic Camera, Cube Camera and the Stereo Camera. Of all mentioned the Perspective Camera is most used as simulates human vision and is used for creating a realistic sense of depth. You can read up on the others here.
//Perspective camera

const camera = new THREE.PerspectiveCamera(
	45, // a field of view, vertical distance
	window.innerWidth / window.innerHeight, // aspect ratio
	0.1, // near clipping plane
	1000, // far clipping plane
);

camera.position.set(-1.7, 0, 8.7); // setting the xyz position
camera.lookAt(1.7, 0, 8.7);

// this handles our scene, when the screen are resized
window.addEventListener("resize", function () {
	camera.aspect = window.innerWidth / window.innerHeight;
	camera.updateProjectionMatrix();
	renderer.setSize(window.innerWidth, window.innerHeight);
});
The PerspectiveCamera primarily needs four parameters which determine it’s frustum. The Clipping plane values define the range of distances from the camera where objects are visible. Objects closer than the “near” value or farther than the “far” value are not rendered.
Lights: They are used to illuminate the scenes creating realistic and visually appealing rendering, they simulate the behavior of real-world light sources and affect how materials and objects in the scene appear. They are also different types of lights.
Ambient lights provide uniform, non-directional light that illuminates all objects in the scene equally. They simulate the indirect or scattered light in an environment.
A directional light simulates distant light sources, such as the sun, which emit parallel light rays, they are typically used to provide uniform lighting across the entire scene and create realistic daylight.
Point lights emit light in all directions from a single point in 3D space. They are commonly used to simulate light bulbs, lamps, or other localized light sources.
const ambientLight = new THREE.AmbientLight("white", 1);
scene.add(ambientLight);

// the values after the color denotes the intensity

const directionalLight = new THREE.DirectionalLight("white", 2);
scene.add(directionalLight);

const light = new THREE.PointLight(0xff0000, 1, 10);
scene.add(light);
Controls
Controls enable user interaction with 3D scenes. These controls allow users to manipulate the camera’s position and orientation, pan and zoom within a scene, and perform other actions to explore and interact with the 3D environment. There are many types of controls, but we’ll only look at one.
import { OrbitControls } from "three/examples/jsm/controls/OrbitControls.js";

const controls = new OrbitControls(camera, renderer.domElement);
controls.update();
controls.autoRotate = true;
Mesh, Geometry and Materials
A Mesh is a Three Object used to create 3d geometry and objects within a scene. Meshes can interact with lights, cast and receive shadows, and respond to user interactions like clicks and hover events.
The Mesh Constructor takes in two values, Geometry and the Material. Basically asking for what shape or object and what material/ material property you would want it to inherit
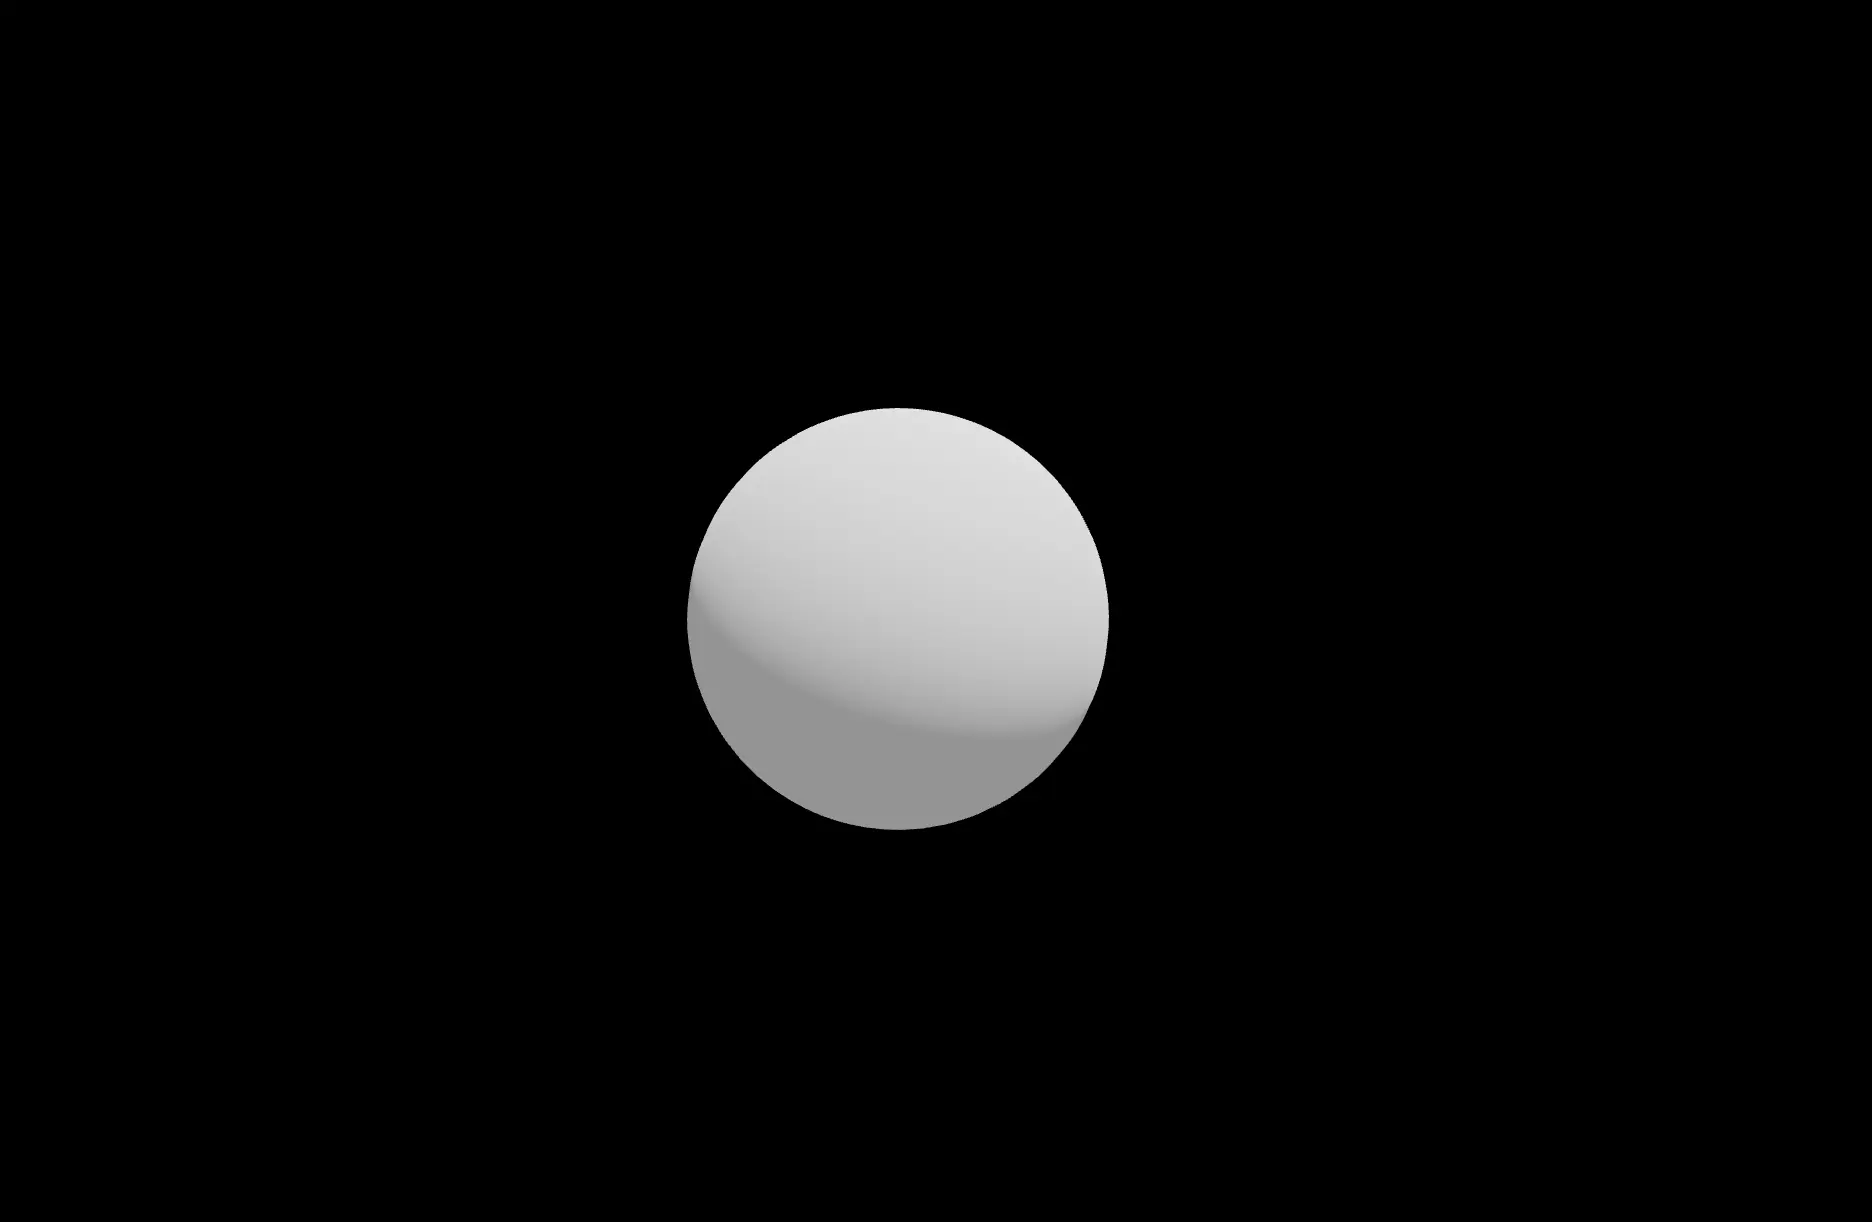
const geometry = new THREE.SphereGeometry(10, 50, 50);
const material = new THREE.MeshStandardMaterial({
	color: "white" || 0xffffff || "#ffffff",
	metalness: 0.5,
	roughness: 0,
});

const ring = new THREE.Mesh(geometry, material);

scene.add(ring); // add ring to scene
In the above code we are creating a sphere with a radius of 10, a width and height of 50. using a standard material to add a colour of white.
This is how it looks like in our scene
Loaders
Loaders are utility classes that help us load external 3D assets, such as 3D models, textures, and other resources, and integrate them into your 3D scenes. There are the GLTFLoader, OBJLoader, FBXLoader and DRACOLoader which are used to load models in their respective formats.
CubeTextureLoader is used for loading cube textures, TextureLoader is used to load and add texture to 3d objects. RGBELoader is used for Loading HDRI’s.
Let’s try and load a .glb file, a 3d model from sketchfab. The model can be downloaded here https://sketchfab.com/3d-models/super-human-7aa58e978b9f4357b8e73d8e0440c896#download
import { GLTFLoader } from "three/addons/loaders/GLTFLoader.js";

const loader = new GLTFLoader();
loader.load("pathto/super_human.glb", (glb) => {
	const model = glb.scene;
	model.scale.set(0.5, 0.5, 0.5); //reducing the size of the model by half
	scene.add(model);
});
if you didn’t comment the sphere code from above, you should have something like this.
You can position the sphere, to be in front of your model and not merged as with the model as they are in the origin. You can also use the grid and axes helper to understand the orientation of your objects in your scene.
const GridHelper = new THREE.GridHelper(100, 100, "pink");
scene.add(GridHelper);

const AxesHelper = new THREE.AxesHelper(100, "green");
scene.add(AxesHelper);

const ring = new THREE.Mesh(geometry, material);
scene.add(ring);

ring.position.y = 30;
ring.position.x = 10;
ring.position.z = 30;
Environment Map
Environment maps are textures used in computer graphics to simulate the lighting and reflections in a 3D scene. It’s a 2D texture that is typically wrapped around a cube or sphere to represent the environment surrounding 3D objects. They play a crucial role in making 3D scenes appear more realistic and visually appealing
Now you can either use a Cubemap or an HDRI “High Dynamic Range Image”. You can read more on HDRI’s here https://visao.ca/what-is-hdri/
We’ll be using one from PolyHaven https://polyhaven.com/a/small_empty_room_3
Also go back to the sphere we created and increase the metalness of the material to 1, and change the colour to ‘lime’.
import { RGBELoader } from "three/addons/loaders/RGBELoader.js";

new RGBELoader().load("pathTo/small_empty_room_3_4k.hdr", (texture) => {
	texture.mapping = THREE.EquirectangularReflectionMapping;
	scene.background = texture; // we make the background our texture
	scene.environment = texture;
});
Now let me explain what’s happening here, we are loading the Hdri and also setting the mapping of our texture so that the items in our environment can reflect the texture. Only the sphere is reflecting because it is metallic, remember we set it to a Metalness of 1.
By setting the Scene.Environment to our texture it takes the lighting information fro the HDRI and adds it our scene.
We should have something that looks like this
This is how the complete codebase should look like:
import * as THREE from "three";
import { OrbitControls } from "three/examples/jsm/controls/OrbitControls.js";
import { GLTFLoader } from "three/addons/loaders/GLTFLoader.js";
import { RGBELoader } from "three/addons/loaders/RGBELoader.js";

const renderer = new THREE.WebGLRenderer({ antialias: true });
const scene = new THREE.Scene();
const camera = new THREE.PerspectiveCamera(
	45, // a field of view, vertical distance
	window.innerWidth / window.innerHeight, // aspect ratio
	0.1, // near clipping plane
	1000, // far clipping plane
);
camera.position.set(0, 0, 100); // setting the xyz position
camera.lookAt(0, 0, 100);

// set the size of our renderer to assume the height and width of the window
renderer.setSize(window.innerWidth, window.innerHeight);

//appending the canvas it creates to the dom
document.body.appendChild(renderer.domElement);

const ambientLight = new THREE.AmbientLight("white", 1);
scene.add(ambientLight);

// the values after the color denotes the intensity

const directionalLight = new THREE.DirectionalLight("white", 2);
scene.add(directionalLight);

const light = new THREE.PointLight(0xff0000, 1, 10);
scene.add(light);

const controls = new OrbitControls(camera, renderer.domElement);
controls.update();
controls.autoRotate = true;

const GridHelper = new THREE.GridHelper(100, 100, "pink");
scene.add(GridHelper);

const AxesHelper = new THREE.AxesHelper(100, "green");
scene.add(AxesHelper);

new RGBELoader().load("pathTo/small_empty_room_3_4k.hdr", (texture) => {
	texture.mapping = THREE.EquirectangularReflectionMapping;
	scene.background = texture; // we make the background our texture
	scene.environment = texture;
});

const geometry = new THREE.SphereGeometry(10, 50, 50);
const material = new THREE.MeshStandardMaterial({
	color: "lime" || 0xffffff || "#ffffff",
	metalness: 0.5,
	roughness: 0,
});

const ring = new THREE.Mesh(geometry, material);
ring.position.y = 30;
ring.position.x = 10;
ring.position.z = 30;
scene.add(ring);

const loader = new GLTFLoader();
loader.load("pathto/super_human.glb", (glb) => {
	const model = glb.scene;
	model.scale.set(0.5, 0.5, 0.5); //reducing the size of the model by half
	scene.add(model);
});

function animate() {
	renderer.render(scene, camera);
}

renderer.setAnimationLoop(animate);

// this handles our scene, when the screen are resized
window.addEventListener("resize", function () {
	camera.aspect = window.innerWidth / window.innerHeight;
	camera.updateProjectionMatrix();
	renderer.setSize(window.innerWidth, window.innerHeight);
});
if you want to straight up run this code, you can create a Vanilla Vite app, install Three.js and paste this in your main Js file. I already have this setup already in a Vite App on my github, you can clone it here:
https://github.com/Akohjesse/Learn3-tutorial
To make the canvas full screen, add this to your css.
* {
	margin: 0;
	padding: 0;
	box-sizing: border-box;
}
That’s it, we’ve successfully done ‘something;, and at the same time learnt the basics of three.js
Incase all of the above doesn’t make sense, this should.
Three.js Journey — Environment map
Three.Js Resources (Paid)
I’m highlighting some paid courses you can take, all the aforementioned resources are free.
Learn Advanced Creative Coding with WebGL and Shaders | WebGL Course
Canvas Master Course | Learn to use Canvas and WebGL with ThreeJS
Three.js Journey — Learn WebGL with Three.js
three JS Fundamentals Course - Learn Three.js from scratch